Finishes for wooden tables
When selecting a new wooden table, there are many choices to make. Once you’ve decided on the model, wood type, and size, there’s still the matter of the finish. The overview below will help you choose between the different wood finishes available for our solid wooden tables.
Solid wood
Solid wood has been used for centuries for a wide range of home applications. Generations have enjoyed this versatile and natural material, now it’s your turn. Unlike artificial materials, the special and unique properties of wood give it its own character. Knots, cracks, scratches, grain, reflections, and textures are inherent in the material, resulting from the conditions in which the tree grew. Therefore, the wooden product examples shown in our webshop and showroom will never be identical to the delivered product.
Work of wood
Wood reacts to the humidity in the air, which in turn is related to temperature. For trouble-free use of wood indoors, a relative humidity of 50%-60% is important. Because wood absorbs or releases moisture from the air, it will expand and contract. The seasons cause constant fluctuations in humidity.
Please note: At certain times of the year, the table may be concave or convex upon delivery. Within four weeks, the table will visibly change to a flatter surface as it acclimates to the humidity in your home.
Daily use
• Protect the table from heat, moisture, and dyes from food and drinks.
• Use placemats or tablecloths to prevent scratches and stains.
• Prevent scratches from abrasive surfaces by using felt pads.
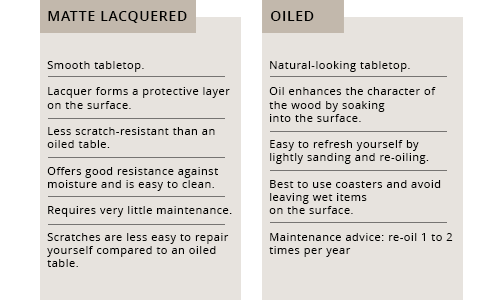
Matte lacquered or oiled table
For a wooden table, you can choose between a matte lacquered, oiled, or whitewash finish. The whitewash finish has the same properties as an oiled table. In the overview below, we’ve listed the main differences between a matte lacquered finish and an oiled or whitewash finish.
Maintenance of wooden tables
For oiled tables, Sav & Økse maintenance kits are available (natural oil and whitewash). These can be purchased both in-store and online. In another article, you can read more about how to maintain your wooden table.
Cleaning & Daily Maintenance
The less cleaning agent you use, the longer the oil will protect the wood of your table. For daily maintenance, use a clean dishcloth, dampened in clean, lukewarm water and thoroughly wrung out. Do not use harsh or abrasive cleaning agents. Wet cloths, cups, vases, etc., cause stains and rings. Spills should be wiped up immediately. Avoid excessive water on the top. The top is factory-finished with a layer of oil, so the table can be use immediately for its intended purpose.
Note: The oil only provides optimal protection 20 days after the last treatment, as it has fully cured. Therefore, be extra careful during the first three weeks.
OILED MAINTENANCE
Care and maintenance ensure a lifetime of enjoyment from our solid wood tables. Use the sanding pad and oil from our maintenance kits for annual table maintenance. These are available in our store or online store. This ensures a protected surface that feels smooth. Minor damage to your tabletop can be repaired.
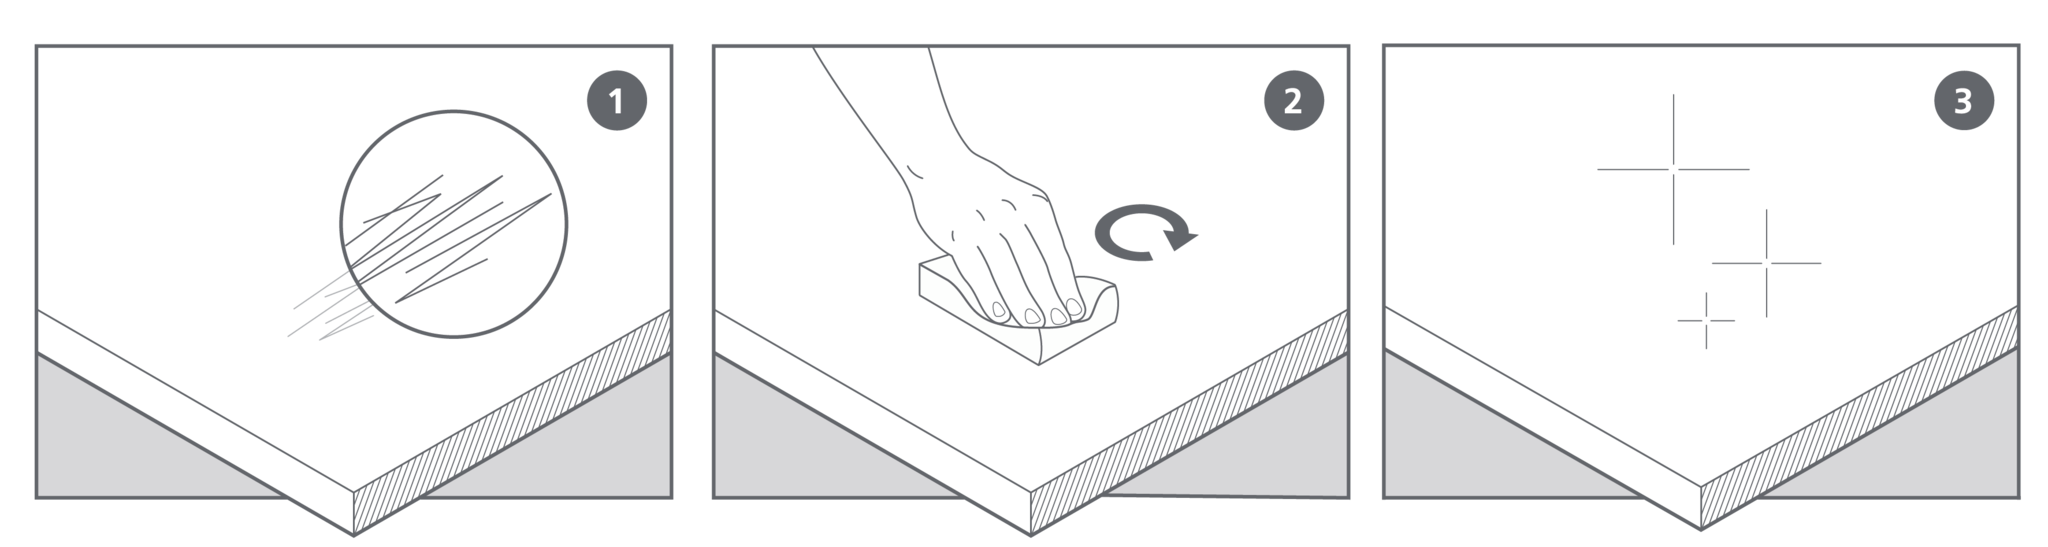
1. SAND DOWN
• For the best result, first sand the table with a 300-grit sanding pad.
• Always sand the table lengthwise, along the grain. (Otherwise, you’ll get scratches!)
Scratch tip: Keep sanding until the scratches are gone. Be careful not to create a dent in the table.
2. OIL
• Dust the table with a slightly damp cloth.
• Then, soak the sponge generously in the oil and rub the table with long strokes (including the edges and butt joints).
• Let the oil soak in for 5 minutes.
• Then, take a cloth and try to rub off any remaining oil from the table (you can scrub vigorously).
• Let the oil soak in for 30 minutes.
• Then, take a new cloth and rub the table again.
LACQUERED MAINTENANCE
For daily maintenance, use a clean dishcloth, dampened in clean, lukewarm water and thoroughly wrung out. Use a mild soap solution if necessary. Although lacquer is more moisture-resistant than oil, prolonged contact with water or other liquids can cause stains and rings. Be careful with wet cloths, cups, or vases. Abrasive cleaners, rough sponges, or cleaning equipment are strongly discouraged.
Abrasive cleaning agents are also not suitable for removing stains. Be careful with hot objects and heat sources. The top is factory-finished with a lacquered finish, so the table can be used immediately for its intended purpose.
Note: The paint only provides optimal protection 20 days after the last treatment, as it has fully cured. Therefore, be extra careful during use, especially during the first three weeks.
FENIX MAINTENANCE
For some table models, it’s possible to add a Fenix top layer to the tabletop. This option comes with the multiple tables. The Fenix layer is available in a range of colours. In addition to giving your table a fresh look, the Fenix top layer provides extra features. Here are the key characteristics of Fenix tabletops:
Key features of Fenix tabletops
• Antibacterial/hygienic: easy to clean
• Fingerprint-resistant surface
• Soft-touch finish
• Extremely matte look
• Non-static
• Self-healing: small scratches can easily be removed with a magic sponge
Normal Maintenance
The Fenix surface should be cleaned regularly, but requires no special maintenance: a cloth with warm water and/or a mild detergent is sufficient. Almost all standard household cleaners and disinfectants are suitable. We recommend using a melamine foam sponge, also known as a magic sponge, for regular cleaning and surface maintenance.
Particular Maintenance
If the dirt cannot be removed with regular cleaning agents, we recommend using a non-aggressive solvent (acetone). For minor scratches, please refer to the specific repair instructions using heat.
Tip for daily Maintenance
For daily maintenance, we recommend cleaning the surface with a melamine foam sponge to ensure proper surface restoration.
Care Instruction: Melamine foam sponge
1. Superficial damage due to micro-scratches.
2. Rub the surface with the micro-scratches with a dry or slightly damp melamine sponge to remove the scratches from the surface with heat.
3. The surface should now be repaired.
Care Instruction: Iron
1. Superficial damage due to micro-scratches.
2. Place a damp paper towel or tea towel on the scratched surface.
3. Place the iron on the area to be repaired. Do not hold it in one place for more than 10 seconds.
4. Clean the repaired surface with lukewarm water and a clean microfiber cloth.
5. The surface should now be repaired.

More information
Do you have a more questions? We are happy to help you and will contact you as soon as possible.


